Image to Click HTML Code Free Mobile Repairing
banner
Image to Click HTML Code Free Mobile Repairing
banner
banner
banner

Saturday 30 September 2017


HOW TO FLASH KEYPAD MOBILE USING MIRACLE BOX 
मिरेकल बॉक्स से कीपैड मोबाइल कैसे फ़्लैश करे 


 क्या क्या चाहिए फ्लशिंग करने के लिए | 


  • कंप्यूटर 
  • ओरिजिनल USB केबल 
  • मिरेकल CRACK VERSION या अगर आप के पास मिरेकल बॉक्सइ तोक्ष और बॉक्स के साथ जो दोंगल आता है |
  • मोबाइल फ्लशिंग USB ड्राईवर 


STEP 1 


  • सबसे पहेले मिरेकल बॉक्स को ओपन कर लीजिये 
  • मिरेकल ओपन करने के बाद जिस मोबाइल को फ्लशिंग करना  उसके CPU सेलेक्ट करेंगे 
  • जैसे अगर आप के मोबाइल में MEDIATEK का CPU लगा है तो आप MTK को सेलेक्ट करेंगे 
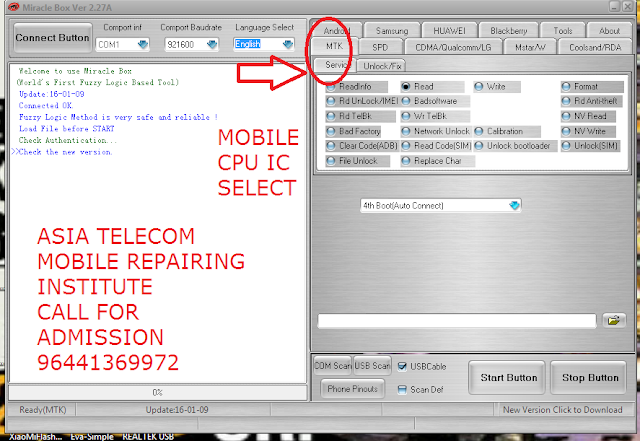
  • CPU सेलेक्ट करने के  बाद SERVICE पर CLICK करेंगे


  •  SERVICE पर CLICK करने के बाद सब पहेले READ INFO में क्लिक करेंगे | चेक करने के लिए की मोबाइल कनेक्ट हो रहा है की नहीं | इस आप्शन से मोबाइल के सॉफ्टवेर की पूरी इनफार्मेशन मिल जाती है 
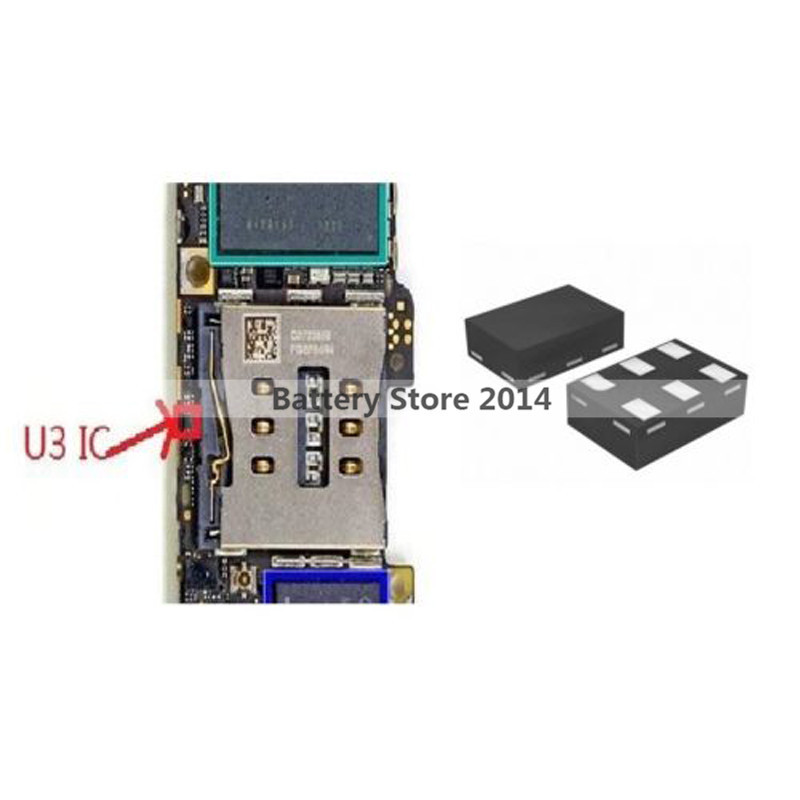
  • मोबाइल को     READ INFO पर क्लिक करने के बाद बूट IC नंबर चुनेंगे  | 
  • बूट IC मोबाइल फ़ोन के CPU IC का नंबर  होती है CPU IC का       नंबर  कैसे पढेगे यह एशिया टेलिकॉम के YOUTUBE channel पर जाईये | वह बताया गया है CPU IC का नुम्बे र्कैसेआ करे 
  • USB केबल पर क्लिक करेंगे | अगर आप USB केबल का यूज़  कर रहे है
  • START BUTTON पर क्लिक करे | उसके बाद आपको  ( WAITING FOR USB PORT )इस तरह का MASSAGE शो होगा | 
  • मोबाइल फ़ोन के बैटरी निकल के USB केबल लगाये और इस बात का ध्यान रखे अगर कीपैड मोबाइल की फ्लशिंग कर रहे है तब कीपैड मोबाइल की बूट key प्रेस करे जो की ज्यादातर उसकी मनु key होती है 
  • यदि एंड्राइड मोबाइल फ़्लैश कर रहे है तब पहेले बिना किसी बूट key प्रेस किये केबल लगाये |
  • यदि कनेक्ट नहीं होता है तब वॉल्यूम उप और वॉल्यूम डाउन को एक साथ प्रेस करके केबल लगाये और तब भी मोबाइल  कनेक्ट नहीं होता है तब सिर्फ या तो वॉल्यूम उप या वॉल्यूम डाउन  एक एक कर करके केबल लगाये 
  • फ्लशिंग करने के लिए WRITE वाला आप्शन को क्लिक करे 
  • BOOT key को सेलेक्ट करे 
  • MEDIATEK CPU में यह SCATTER फाइल का आप्शन देगा | कीपैड है तो फाइल का फॉर्मेट .BIN होगा 
  • फाइल को कंप्यूटर से सेलेक्ट करने के  बाद START बटन क्लिक  करे | 
  • मोबाइल को  जैसे उपर  बताया गया वैसा  UCB केबल  के   साथ   कनेक्ट करे |
  • मिरेकल बॉक्स से कनेक्ट होते ही फ्लशिंग चालू हो जाएगी | 


नोटस -  

  • जिस भी मोबाइल को फ़्लैश करना है उसका  फ्लशिंग USB ड्राईवर इनस्टॉल पहेले कर लेंगे | नहीं  तो मोबाइल  मिरेकल से कनेक्ट नहीं होगा | 
  • फ़्लैश फाइल भी पहेले से डाउनलोड कर के रख लेंगे | 
  • गलत फ़्लैश  यूज़ करने से आपका   मोबाइल  SOFTBRICK यानि डेड हो सकता है  
  • सही तरीके   से  फ़्लैश करे जैसा उपर  बताया है

Note - We will not be responsible for any loss or damage whatsoever caused if you will attempt or follow my video.Please do it at own risk. =============================================== LIKE, COMMENT AND SUBSCRIBE FOR MORE


Saturday 16 September 2017


IPhone 5s Wifi BT Problem Solution Repair Ways - IPhone 5s Wifi BT सलूशन जम्पर पिक्चर के साथ 


Today we will discuss the issues on Wifi or BT Apple iPhone 5S , Wifi or BT problems often experienced by all cell phone brands in this world, this problem would make the dead lice or mobile phone users gadgets. Damage to the Wifi or BTiPhone 5s  usually occurs because the plugins that have been damaged. Here are the steps to solve Wifi or BT problem.


Reasons of Problems
Phone could be water damaged. पानी में जाने के कारण | 
Dust particles might be present in PCB. डस्ट आने के कारण | 
Software Problem.  सॉफ्टवेर प्रॉब्लम आने के कारण |
Wifi & BT Antenna flex Cable broke or lose  .  ऐन्टेना केबल लूज़ या ख़राब हो जाने के कारण | 
Phone is encountered any physical damage. ज़मीन पर गिर जाने के कारण |
Wifi BT IC might be faulty. 


Solution  


Step 1 - First Restore iPhone 5s ( Do Flashing). it may be software problem  
सबसे पहेले फ्लशिंग कर के चेक करो | 

Step 2 - First Open your Mobile & Disassemble your PCB 
पहेले मोबाइल फ़ोन को ओपन करो  | 

Step 3- Wash mobile PCB using Acetone & thinner. Dust particles might be present in PCB
मोबाइल PCB को अच्छे से वश करे | डस्ट आने के कारण सप्लाई रुक जाती है वश कर ने से सप्लाई चालू हो जाएगी


Step 3 - Check iPhone 5S Wifi & BT Antenna Flex Cable Connector, if flex cable is lose than reconnect it , if  Flex cable is damage than replace it 
 iPhone 5S Wifi & BT का ऐन्टेना फ्लेक्स केबल चेक करो | अगर लूज़ है तो फिर से अच्छे से वापस लगाये | अगर फ्लेक्स केबल ख़राब है तो उसे चेंज कर दे | 


Step  - Check Continuity from WiFi BT antenna Socket to IC ( U12_RF) Check Supply Component ( L33_RF,R13_RF ) 

WiFi BT ऐन्टेना सॉकेट से सप्लाई लाइन को WiFi BT IC तक ट्रेस करे | WiFi BT ऐन्टेना से सप्लाई लाइन में लगे कॉम्पोनेन्ट (L33_RF,R13_RF)  को चेक करे | 


Step  - Check Supply Component ( C106_RF, R107_RF ) to WiFi BT IC ( U8_RF) 

सप्लाई लाइन में लगे कॉम्पोनेन्ट ( C106_RF, R107_RF )  को चेक करे | 


Step - Rehot or Replace Main WiFi BT IC (U8_RF) 

WiFi BT IC को Rehot करे | उसके बाद WiFi BT IC को चेंज करे | 


Thursday 14 September 2017


IPhone 5s Power Button Not Working Problem Ways Solution- IPhone 5s Power Button कैसे बनाये  - जम्पर पिक के साथ सलूशन 


This article is for Apple iPhone 5s Hardware Keys not working problem solution. So if any of the Hardware keys like Power Button, Volume Up  and Down Button is not working in your iPhone 5s this post can be useful for you.

So if your iPhone 5s  power button is not working to repair it you just need to replace it with a new one. If the prints of the button are damaged then you are going to have to make the jumpers as shown in the diagram.
First of all check the phone if anything else is not causing this problem. If your phone is off and you can’t check the button plug the charger in and see if the phone is charging, if it isn’t turning and it isn’t charging too then probably the problem is with your phone’s software and you need to flash it. If the phone is on or charging but the power button is not working make the jumpers as shown in the diagram below.

Reasons of Problems
Phone could be water damaged. पानी में जाने के कारण | 
Dust particles might be present in  power key connector. डस्ट आने के कारण | 
Connection in the phone might be broken.  कनेक्शन ख़राब हो जाने के कारण | 
Phone is encountered any physical damage. ज़मीन पर गिर जाने के कारण |
Any of the capacitors might be faulty. किसी कापसिटर के ख़राब हो जाने के कारण | 


Solution  


Step 1 - First Open your Mobile & Disassemble your PCB 
पहेले मोबाइल फ़ोन को ओपन करो  | 

Step 2- Wash mobile PCB using Acetone & thinner 
मोबाइल PCB को अच्छे से वश करे | 

Step 3 - Check iPhone 5s power key flex cable , if  flex cable is damage than replace it 


पॉवर फ्लेक्स केबल  को चेक करेंगे | अगर फ्लेक्स केबल  टुटा है तो रीप्लेस करेंगे |  


Step 4 - Check iPhone 5s power key PCB Connector, If broke than Replace

PCB पर लगे पॉवर की कनेक्टर को चेक करेंगे |  


Step 5 - Do cold testing on Power key connector pin no.9 ( Resistance 250 ohms to 1600 ohms )

पॉवर की कनेक्टर की पिन नंबर 9 पर कोल्ड टेस्टिंग करेंगे | 


Step 6 - If no Resistance Found than do tracing 

अगर कोई रीडिंग नहीं आये तब ट्रेसिंग करेंगे | पॉवर की की सप्लाई लाइन में लगे हुए कोम्पोनेंत्सको चेक करेंगे  


Step 7 -  Change Hold Key IC (U3) 

पॉवर की IC को चेंज कर देंगे | यह IC (U3)  आपको आसानी से आपके लोकल मार्किट या ऑनलाइन शॉप में मिल जाएगी | 


Wednesday 13 September 2017


Xaiomi Mi Note 3 Charging Problem Solution Repair Ways - Xaiomi Mi Note 3 चार्जिंग सलूशन जम्पर पिक्चर के साथ 


Xaiomi Mi Note 3 Ways Solution Jumper Problem Repair

Today we will discuss the issues on charging or charging Apple iXaiomi Mi Note 3 , charging or charging problems often experienced by all cell phone brands in this world, this problem would make the dead lice or mobile phone users gadgets. Damage to the charging Xaiomi Mi Note 3  usually occurs because the plugins that have been damaged. Here are the steps to solve charging problem.


The first step that should be done is to replace the charger plug or the charger connector, usually  damage to the pin or needle in the charger plug. If after replacing the plugin does not solve the problem. Try the next step.
The second step checks charger lines as in the picture below, if there is a path-breaking try to do the jumper.
Reasons of Problems
Phone could be water damaged. पानी में जाने के कारण | 
Dust particles might be present in charging connector. डस्ट आने के कारण | 
Your charger might be faulty. चार्जर ख़राब यूज़ करने के कारण | 
Connection in the phone might be broken. चार्जिंग केबल कनेक्शन ख़राब हो जाने के कारण | 
Phone is encountered any physical damage. ज़मीन पर गिर जाने के कारण |
Any of the capacitors might be faulty. किसी कापसिटर के ख़राब हो जाने के कारण | 
Charging IC might be faulty.


Solution  


Step 1 - First Open your Mobile & Disassemble your PCB 
पहेले मोबाइल फ़ोन को ओपन करो  | 

Step 2- Wash mobile PCB using Acetone & thinner 
मोबाइल PCB को अच्छे से वश करे | 

Step 3 - Check Xaiomi Mi Note 3 Dock Connector, if  Dock connector is damage than replace it 

Check Input Voltage 5 to 6 V. 

Charging Connector Pin supply
Pin no.1 - Vcharge / Vbus  ( 5to6V) 
Pin No.2- D- / DM / DN  ( USB Data - ) 
Pin No.3 - D+ /DP (USB Data +) 
Pin No.4- NC/ ID 
Pin No.5- GND 


चार्जिंग डॉक  कनेक्टर को चेक करेंगे | अगर  कनेक्टर टुटा है तो रीप्लेस करेंगे |  


Step 4  - If Dock Connector is ok , Than Check PCB Connector ( Replace if Broke ) 

अगर डॉक कनेक्टर सही है तो मोबाइल PCB के कनेक्टर को चेक करे 


अगर डॉक कनेक्टर सही है तो मोबाइल PCB पर लगे कनेक्टर को चेक करेंगे | ख़राब होने पर चेंज कर देंगे | 
Step 5 - Check Cold Testing (Resistance Value ) on Charging Pin No .2


कनेक्टर की पिन नंबर  2 पर कोल्ड टेस्टिंग करेंगे |


देखे -  कैसे करे कोल्ड टेस्टिंग 


Step 6 - If No Resistance Found than Do Tracing , Check ( C14,C15,C127 for Short) 
अगर कोल्ड टेस्टिंग करने पर रीडिंग ना आये तब ट्रेसिंग करेंगे | उसकी सप्लाई लाइन में लगे कापसिटर चेक करेंगे |  


Step 6 - Check charging supply line to charging IC . Check Capacitor C201 

चार्जिंग कनेक्टर की सप्लाई लाइन चेक करेंगे | सप्लाई लाइन में लगा कापसिटर चेक करेंगे  |


Step - 7 Change Charging IC 
चार्जिंग IC को चेंज करेंगे | 


Note: Every repairing solution posted here is tested by at least one member of our team. Use the information available here at Your Own Risk. We are not responsible if any harm comes to your device during the repairing process.


IPhone 5 Charging Problem Solution Repair Ways - IPhone 5 चार्जिंग सलूशन जम्पर पिक्चर के साथ 


iPhone 5 Charging Ways Solution Jumper Problem Repair

Today we will discuss the issues on charging or charging Apple iPhone 5 , charging or charging problems often experienced by all cell phone brands in this world, this problem would make the dead lice or mobile phone users gadgets. Damage to the charging iPhone 5  usually occurs because the plugins that have been damaged. Here are the steps to solve charging problem.


The first step that should be done is to replace the charger plug or the charger connector, usually  damage to the pin or needle in the charger plug. If after replacing the plugin does not solve the problem. Try the next step.
The second step checks charger lines as in the picture below, if there is a path-breaking try to do the jumper.
Reasons of Problems
Phone could be water damaged. पानी में जाने के कारण | 
Dust particles might be present in charging connector. डस्ट आने के कारण | 
Your charger might be faulty. चार्जर ख़राब यूज़ करने के कारण | 
Connection in the phone might be broken. चार्जिंग केबल कनेक्शन ख़राब हो जाने के कारण | 
Phone is encountered any physical damage. ज़मीन पर गिर जाने के कारण |
Any of the capacitors might be faulty. किसी कापसिटर के ख़राब हो जाने के कारण | 
Charging IC might be faulty.


Solution  


Step 1 - First Open your Mobile & Disassemble your PCB 
पहेले मोबाइल फ़ोन को ओपन करो  | 

Step 2- Wash mobile PCB using Acetone & thinner 
मोबाइल PCB को अच्छे से वश करे | 

Step 3 - Check iPhone 5  Dock Connector, if  Dock connector is damage than replace it 

चार्जिंग डॉक  कनेक्टर को चेक करेंगे | अगर  कनेक्टर टुटा है तो रीप्लेस करेंगे |  


Step 4  - If Dock Connector is ok , Than Check PCB Connector ( Replace if Broke ) 


अगर डॉक कनेक्टर सही है तो मोबाइल PCB पर लगे कनेक्टर को चेक करेंगे | ख़राब होने पर चेंज कर देंगे | 
Step 5 - Check Cold Testing (Resistance Value ) on Charging Pin No .21,22,23


कनेक्टर की पिन नंबर 21,22 और 23 पर कोल्ड टेस्टिंग करेंगे |


देखे -  कैसे करे कोल्ड टेस्टिंग 


Step 6 - If No Resistance Found than Do Tracing , Check ( C14,C15,C127 for Short) 
अगर कोल्ड टेस्टिंग करने पर रीडिंग ना आये तब ट्रेसिंग करेंगे | उसकी सप्लाई लाइन में लगे कापसिटर चेक करेंगे |  


Step 6 - Change Charging IC ( Q2 -CSD75202W15) or make it jumper 

चार्जिंग IC को रीप्लेस करेंगे या आप उसे जम्पर भी कर सकते है 


Note: Every repairing solution posted here is tested by at least one member of our team. Use the information available here at Your Own Risk. We are not responsible if any harm comes to your device during the repairing process.