


.png)
How to Open an iPhone 5,5G,6,6s,6s+
If you want to get a closer look at the innards of your new iPhone 6 or want to try replacing the battery on your own, you will need to disassemble the iPhone using a few simple tools. Opening up your iPhone will void your warranty, so always check to see if your service can be performed by Apple before you attempt it yourself. Follow this guide to open your iPhone in just a few short minutes

1
Power down your iPhone. Before you open the case, make sure your iPhone is completely turned off. Simply turning the screen off will not suffice. Press and hold the Power button until the power slider appears. Slide the slider with your finger, and your phone will turn off after a few moments.


- Opening the iPhone without shutting it down can cause the iPhone to completely malfunction.

2
Remove the SIM card. To avoid damaging your SIM card during the disassembly, remove it first. The method varies depending on your iPhone model, but generally, you will need a paperclip to press the SIM release button

3
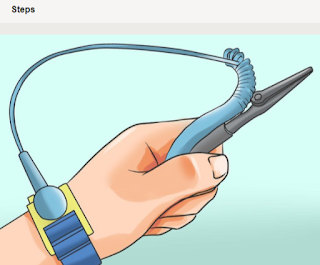
Before opening the iPhone, make sure that you are properly grounded so that you don’t damage the components with a static charge. You can ground yourself by touching exposed metal.

4
Remove the screws. There are two tiny screws at the bottom of the iPhone that need to be removed before you can open the phone. These screws are located on either side of the connection port.

- The Original iPhone and 3GS need a Phillips #00 screwdriver to remove the screws. The iPhone 4 through the iPhone 6 models require a pentalobe (five-point) screwdriver.
- The screws are tiny, so be sure not to lose them after you have removed them from the iPhone.

5
Pry open the case. Once the screws are removed, you can pry the case open using a small flathead screwdriver. Insert the screwdriver directly above the connection port where you removed the screws. Gently push until the screen pops out of the casing.

- Alternatively, you can attach a large suction cup to the bottom of the screen and slowly pull it up until the screen separates from the casing. This may cause less damage than trying to force a screwdriver into the casing.[1]
- Open the case slowly. The screen is attached to the phone components with several ribbon cables. If you separate the screen too quickly, you may damage the cables.

6
Detach the ribbon cables. There are three small ribbon cables located at the top of the iPhone that connect the screen to the iPhone motherboard. To completely remove the screen, you will need to detach these cable.


- You must remove two ribbon connectors first before you can access the third connector.
- Be especially careful when removing these ribbons, as damaging them will render your iPhone useless.

7
Remove the screen. Once you have removed the ribbons, you can set the screen assembly aside. Be sure that you do not damage the screen while you are not using it.

8
Access the motherboard. If you need to access the motherboard, remove the screws around the metal plate. Some screws may be covered by stickers. Once you remove all the screws, you can lift out the motherboard from the case.

9
Remove the battery. In older iPhones, the battery is glued to the back plate of the iPhone. Use a small flathead and work your way around the battery, gently prying it off of the back plate. Be very careful not to puncture the battery during removal.
- Newer iPhones have removable batteries that you can lift directly out of the housing after your remove the screw holding it in place
10
Reassemble the iPhone. When you are done with your repair work, you can reassemble the iPhone by reversing the steps above. Make sure that all of your ribbon connections are plugged back into the correct sockets
.


No comments:
Post a Comment